

To make your own chalk you will need –
- Pottery Plaster or Plaster of Paris
- Water
- Tempura powdered paint (food colouring works too!)
- Silicon mould
- Spoon
- Bowls
- and children to get involved in the making process 😉

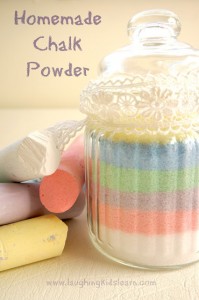
DIY Homemade multicoloured chalk
- Add 2 tbsp of water to a small bowl
- Add to that 3 tbsp of plaster powder
- Add 1/2 tsp tempura powdered paint (or 6 – 8 drops of food colouring)
- Mix well
- Add a few drops of water if mixture is too dry

Making the mixture just right
Once you have all the ingredients combined, be sure the mixture is thick enough not to fall off the spoon too easily (see above). If the mixture is too thin and like water then you’ll find you make chalk with a layers instead, which sounds cool too!

Putting the colours together
To ensure the colours appear throughout the chalk piece you’ll need to apply small blobs of coloured mixture to various areas in and around the mould (see above).
This can seem quite difficult when you are trying to work quickly so the plaster doesn’t set. Don’t get too worried but be sure to not delay during this process if you can.

Chalk mixture has been added to the moulds.
Important Step!
Once your moulds are almost full, add a final amount of the plaster that is quite runny. You achieve this by add another tbsp or two of water to the above recipe. Pour this over the top of your coloured blobs so to fill any ‘gaps’ between the colours and also strengthening your chalk when it comes to drawing.
Be sure to wait at least 12 hours before removing your homemade chalk pieces.


Of course there is also the option of making your own coloured chalk pieces, which is a lot easier.

Here is a picture of my nephew starting to draw a house using his multicoloured chalk piece. We both were so excited to watch the colours within the chalk pieces change and disappear.
What fun ideas do you have for playing with chalk?


Here are some more great ideas found on Laughing Kids Learn
I like the multicolored ones the best. This is something I would really like to try one day. I am going to put it on my to try list!
These were so much fun to make and would make unique gifts for kids too!
Wow, I love this! Didn’t even know you could make chalk yourself. I just came home from IKEA and bought some cute little silicone moulds, didn’t really know what I’d use them for but I knew they’d come in handy for something and I think this is it!
Really really fabulous Kate 🙂 You know my litttles LOVE jumbo chalk and yours looks wonderful. Beautiful photos 🙂
Thank you Kate. I appreciate your lovely comments. Hopefully you get some time to make some of these chalk pieces with your little one. 🙂
This is a must do! I’m pinning for later. Thank you for sharing 😀
Thanks lovely.
This looks fab! A few years ago I tried making chalk eggs. I lined the plastic eggs with vaseline before adding the chalk. I notice that you haven’t used vaseline- does the chalk pop out of the moulds quite easily?
SO easily Jackie. It basically just falls out cleanly. So wonderful and much better than vaseline. YAY
What a fantastic experience to experiment with mixing and creating colours. Thank you for sharing this process to make chalk and your stunning results. Elise @ Creative Play Central
Thanks Elise! 🙂
NO WAY!!! That looks so easy to make. I think I have all the stuff in our art cupboards. Can’t wait to try this with the kids tomorrow. Thanks so much Kate! (I didn’t know you had an artistic mother – – – but then again, it doesn’t surprise me one bit; the apple doesn’t fall far from the tree). xo P
My mum makes the most amazing things! Great for creative advice. 🙂
Thanks Pauline.
These are too cute. I seen this all over Pinterest.
Very pretty
Thanks lovely!
We have tried making chalk before using crushed egg shells …it was a complete disaster!! This method is so simple and the chalk turns out perfect, we will def be trying this out. Thanks 🙂
My little one has an egg allergy so we wouldn’t have been able to try it with eggs but this is heaps easier. 🙂
These are so lovely. I might jut steal your idea and make animal ones. They are sooo lovely. It makes me want to pull the chalk out now!
Oh Penny that would be awesome!
I love the star shapes, very cool! Pinned x
They look great as stars, don’t they! 😉
They are really cool. I had no idea how to make my own chalk and now I do! haha. Thanks!
The lady in the craft shop didn’t either. Made me feel really clever. LOL
Every time I see a fab chalk activity I get envious of all of you who have footpaths and concrete driveways! I so badly want a little concrete so we can draw with chalks! LOL My kids will love making this for their black board and one day we’ll have some concrete!
I took advantage of the school that is just down the road from us. 😉 LOL
Thanks Kate
Sensational! Will have to try!
Thank you Six Little Hearts! Let me know how you go with it.
Much appreciate your comment. 🙂
I had no idea making chalk was so easy! That’s a great tutorial and I’m sure we will be trying. It will be fun to add another dimension to an activity that’s already a favourite at our place 🙂
Thanks Kate! It really is THAT easy. 🙂
Wow! How fantastic do they look!?
Thanks Kelly! They turned out so well.
I really love this! Pinned!
Thank you lovely Danya
This is just genius Kate…thanks so much for sharing your recipe. Going to try it out for my fdc kids to use on the outdoor chalkboard next week! Pinned of course!
Thanks Jodie! I love that they are something you can make and use again another day. I appreciate your comments. 🙂
It was seriously easy. I tried it like 4 to 5 times and always the results were superb.
Thanks for sharing
Xoxo
Bài viết bạn rất hay:Tác dụng của đông trùng hạ thảoTác dụng của đông trùng hạ thảo với nam giớiTác dụng của đông trùng hạ thảo với phụ nữ
I would really like to try your recipe and my dad works with some of that stuff so I’m really exited!! And happy mothers day